Additive Manufacturing
Uses for TPU
TPU is a flexible filament that's really nifty, although annoying to work with. If you make it sufficiently thick, it's quite durable while being flexible and forgiving for tolerancesm which is great for when you really need to get a printed part to fit something snugly and you don't want to reprint it a number of times.
Tips:
- Go slow (10 mm/s) and avoid retraction.
The slow just helps somehow, and not using retraction helps with clogged nozzles.
- Avoid using rafts or supports
TPU is flexible and it also annoying to clean up. Avoid supports
- Use hot air or a lit match to remove stringing
It can fuse with PLA & PETG apparently, so I can't wait till AMS systems are as commonplace as bed levelling. I would kill for PETG parts that are partially lined with TPU to make everything fit a bit more snugly. Like, tolerances would no longer be an issue AND it would be so much better.
- Gaskets / O-rings / Seals
Gasket for waterproofing a box or sample holder
- Cable guides
- Shock absorbers / Vibration-damping components
Vibration damper feet for equipment like 3D printers
These weightlifting plates are made of steel and don't need protection. The cover is to prevent noise and for fragile tiles to not be broken.
- Feet that use TPU for friction and scratch protection
- Drive belts
Maybe get an actual one for anything with tension, but it works well enough for harmonic drives on my stepper motors.
- Bumpers & protective coverings/sleeves
Great for cat food and canned items that can't be consumed by one person in one sitting.
TPU printed bucket lid This is a lid for the gallon containers of water we get in the UAE. While we do have water dispensers (essential for cold water), my family keeps a bottle open for transfering water quickly to a jug. This keeps the bucket closed. We used to keep the lil cap it comes with.
- Corner protectors
Corner protector for table.
- Soft workholding
- Keychain stuff
- Molded grips
- Hose adapters
Works surprisingly well, actually. Just flexible enough to be forgiving of tolerances, and with enough friction/adhesion to stay on without the need for fasteners.
vacuum cleaner connections that are also somewhat flexible
Meant for holding the filament hoses together on a 3D printer
- Miscellaneous
Storage for sewing machine bobbins Doorstop that uses TPU for friction and PETG for frame
- Airless tyres (for 4x4 in schools)
- Infill tests
TPU is soft and flexible enough for you to squish, and you can really get a feel for how different infill patterns deform.
- Stiffness Demo Collection with TPU
- TPU infill test
- Infill pattern squish test with labels
- TPU infill
Nintendo Switch
A Horizontal switch holder
https://www.printables.com/model/226387-nintendo-switch-horizontal-flip-dock
A discrete cover to cover up that plastic surface. https://www.printables.com/model/751355-nintendo-switch-dock/files
SpaceSway
https://www.printables.com/@SpaceSway/models
I like the 3D printed tools. Do i think that I'd print screws? Not really. But I do like the ready to print files for just about everything It's like, it's the best possible solution for
Dremel
https://www.printables.com/@techdumpling_275591/models
gridfinity sanding wheel organizer set by techdumpling
https://www.printables.com/model/378774-gridfinity-sanding-wheel-organizer-set
Gridfinity general dremel bit holder by techdumpling
https://www.printables.com/model/378760-gridfinity-general-dremel-bit-holder
Gridfinity abrasive disk dremel organizer
Gridfinity abrasive disk dremel organizer by techdumpling https://www.printables.com/model/378789-gridfinity-abrasive-disk-dremel-organizer/files
3D printed feeler guages
Ranges from 2mm to 7mm in increments of 0.5mm. Width is 15mm Length is 180mm. Rounded corners and text, along with a hole for arrangement.
Solder scroll
solder scroll
Cable Storage
https://www.printables.com/model/1234213-cable-spool-holder-gridfinity/files
Laboratory Stand
Laboratory stand Hautumanteika https://makerworld.com/en/models/1450930-laboratory-stand#profileId-1511381
3D printed engineering models
Valve Model Series - Butterfly Valve https://makerworld.com/en/models/1434411-valve-model-series-butterfly-valve#profileId-1492077
Klipper and Mainsail
https://all3dp.com/2/mainsailos-simply-explained/
Inserting magnets into 3D prints
I've seen most people suggest having a little drop of superglue to keep the magnets in place
This helpful commentor on Reddit also suggests taping a magnet under print bed to prevent the upper magnet from jumping to thr print head
Another commentor from the same thread suggests having three or five vertical grooves in holes to provide just enough friction to precent the magnet from coming back out, without needing too much force to insert.
RE: size It really does depend on the application. But in my experience 6x3 is pretty common. There are plenty of variety packs you can order though. Smaller ones provide less magnetic strength but mean you can place them in smaller places. I have been treated well with 6x3 and 6x2mm magnets. Size: Depending on the strength needed for your magnet, choose an appropriate size. Larger magnets will clearly be stronger because they have a stronger magnetic field. Of course, you’ll have to choose the size and shape that fits your desired application. For example, if your part is thin but needs a strong magnet, choose one that has a large diameter but small height (i.e. a thin and wide magnet).
RE: magnet material type Avoid ferromagnets, use rare earth magnets You can find out for yourself but avoid ferro magnets like the plague. They are only good for gluing paper to a magnet or maybe holding something to a refrigerator whereby you’re only expecting to hold one piece of paper. Again, experiment and see for yourself if all you are doing is creating refrigerator magnets. Rare earth magnets are what you want to use if you are going to embed inside of a model. They are expensive by a long short over ferro magnets but do the job better than anything else. Try both ferro and rare earth and judge for yourself. Material: Neodymium magnets are popular because they’re strong (relative to their size and weight) and can withstand quite high temperatures depending on the exact type. Generally, you’ll want to keep a generic magnet below 70 °C long term to preserve its magnetism.
Two magnets that are gonna stick to each other, as opposed to sticking to a metal wall If you’re making, let’s say, two models that are going to stick together, such as a box with a magnetic lid, then you can easily use two opposing magnets, one on each side of the print. This is exactly what Bambu does with the nozzle cover. In that case, you don’t need thicker magnets; two opposing magnets work well and round magnets are suitable to this purpose. I might also recommend saving on CAD time and using the cut model feature in the slicer in combination with dowels which will give you a perfect press fit. (let me know if there is interest and I can post a tutorial)
RE: printing over the magnet You normally design with this issue in mind, there should always be at least three layers on top of the printed magnet to give a reasonable appearance. Depending on the filament being used, possibly more layers.
You could begin the printing over the magnet by purposely creating a void one layer taller than the true thickness of the magnet, this will create a icy better surface no contact will be made with the metal magnet, instead a bridge will be used to span over the single layer space above the magnet.
This obvious issue with this technique is the magnet has a tiny amount of space to move up and down in which will create a rattling noise when the model or part is moved up and down.
Regarding taking nozzle diameter and layer height into account Assuming you are using cylindrical magnets and placing the face up, try the following.
Add a cylinder part to the model, make its size 0.4mm larger diameter (to width and depth) than the actual magnet is and the height set as the magnet dimensions.
Move the part to where you would like it to be, at least 0.2mm (one layer) from the base or surface^. Make sure the location sits exactly on a layer, exactly divisible by your chosen layer height, likely 0.2mm.
Right-click the part or from the objects menu and change the part type to negative space.
Repeat for as many as you need.
If your magnet is thicker than 3mm or the diameter is bigger than 10mm consider increasing the distance from the surface.
^ If you place the magnet close to the bed, the magnet will stay in place due to being attracted by the magnetic bound plate. If you place it closer to the top, this may cause you issues if the print head attracts the magnet and rips it out. It has happened to be, just be cautious.
RE: holes for magnets, use a compliant fit
A compliant press fit uses the slight flexibility of plastic as well as compliant design features to “grip†the magnet. This is a secure and simple method of mounting that doesn’t require any glue. However, for added security, it’s recommended to also use a drop of glue.
In your design, model the hole the exact size or slightly larger, or smaller, than the magnet depending on the tolerances for your 3D printer. You’ll want to model the hole’s height slightly larger than that of the magnet, though.
Then, add fins or other compliant features so that the hole can expand slightly. For a more secure hold, use fewer and stiffer fins. The hole will expand less and have a stronger grip on the magnet. However, this also depends on printer tolerances. For example, if the hole is too small, you might not be able to fit the magnet in at all.
Alternatively, you can model the hole so that the magnet fits into it easily. Simply add more flexible fins, which will allow the hole to flex more. However, this means that the hold will be less secure.
An example of the designs can be found in the picture above. The design on the left shows a more secure and less compliant fit, while the design on the right shows a more flexible and compliant fit. Feel free to play around with other fin styles for compliant holes to get your desired outcome.
After printing, firmly press the magnet into your compliant hole – with a drop of glue if you’d like.
References https://www.reddit.com/r/3Dprinting/comments/vi435v/embedding_magnets_into_a_design_is_quite/ https://forum.bambulab.com/t/magnets-in-prints/76022 https://all3dp.com/2/how-to-embed-magnet-in-3d-print/ https://www.powerelectronictips.com/basics-of-designing-with-permanent-magnets/ https://www.gme-magnet.com/info/the-best-magnet-design-guide-102860492.html https://magneticsmag.com/some-design-considerations-using-permanent-magnets/
RE: measuring magnets Use your calipers to measure the exact dimensions of your magnets.
3D printable magnets
https://hackaday.com/2016/03/21/just-when-you-thought-magnets-werent-magic-magnets-are-mechanisms/ http://www.polymagnet.com/
Iron nitride, an alternative to rare earth magnets
https://www.stanfordmagnets.com/iron-nitride-permanent-magnets-a-comprehensive-guide.html
Halbach arrays
https://www.stanfordmagnets.com/all-about-halbach-arrays.html
Types of magnetism
https://www.stanfordmagnets.com/types-and-examples-of-magnetism.html
Torque Limiter
https://www.stanfordmagnets.com/all-about-torque-limiting-couplings.html Why Torque Limiters Matter
The next time your factory avoids a costly breakdown or your car’s power steering survives a pothole, take a moment to appreciate the torque limiter silently doing its job. As one engineer aptly put it: “They’re like insurance—you don’t notice them until you really need them.â€
If you’re wondering whether your equipment could benefit, here’s a simple rule of thumb: if a jam or overload could cost you more than $1,000 in repairs, investing in a $300 torque limiter is likely a wise decision.
Resources:
https://www.kjmagnetics.com/magnet-strength-calculator.asp https://www.kjmagnetics.com/ https://www.magnetshop.com/magnet-design-guide https://www.magnetshop.com/online_calculators
What is the strongest magnet https://www.stanfordmagnets.com/what-is-the-strongest-magnet.html
Monostable/Bistable Hinges with magnets
https://www.designreview.byu.edu/collections/the-magic-of-magnets-in-mechanical-design
Measuring force provided by magnets
http://dx.doi.org/10.1109/TMAG.2011.2129524 There's a distance at which the force is maximum, and it's not when the magnets touch each other (surprisingly)
Nespresso pod holder for fridge/microwave
I like the one that keeps it on the machine but fine
https://www.printables.com/model/461131-magnetic-nespresso-pod-holder
Soft jaws that use magnets to stick onto the vice
https://www.printables.com/model/461693-soft-jaws-for-wilton-vise https://www.printables.com/model/459452-magnetic-soft-vise-jaws
These soft jaws can be stored on the vise, and they add a bit of color to the surface :)
Magnetic connector, similar to the MagSafe charger once sold by Apple
https://www.printables.com/model/461092-magnetic-connector
Magnet Socket organizer
https://www.printables.com/model/442405-magnetic-socket-organiser-parametric-openscad
Use magnets to keep the sockets in place. Am not sure if the sockets are magnetic enough (they're usually high carbon with a chrome plating, but could just be some chrome steel)
Full Size Anatomically-Correct 18-Piece Magnetic Human Skull Model
https://www.thingiverse.com/thing:4830026 https://thangs.com/mythangs/file/60036
To assemble with magnets, you will need: • 66 of OD 1/8†x 1/16†cylindrical • 38 of OD 1/4†x 1/8†cylindrical
Magnets
Aliexpress has them!
https://www.aliexpress.com/item/1005008882136145.html
| Size | Qty | AED |
|---|---|---|
| 5x2 | 50 | 10.82 |
| 8x2 | 50 | 13.55 |
| 10x1 | 30 | 11.04 |
| 10x2 | 30 | 12.37 |
| 10x3 | 30 | 14.29 |
| 10x1 | 50 | 12.06 |
| 10x2 | 50 | 14.46 |
| 10x3 | 50 | 17.32 |
Magnet dispensers
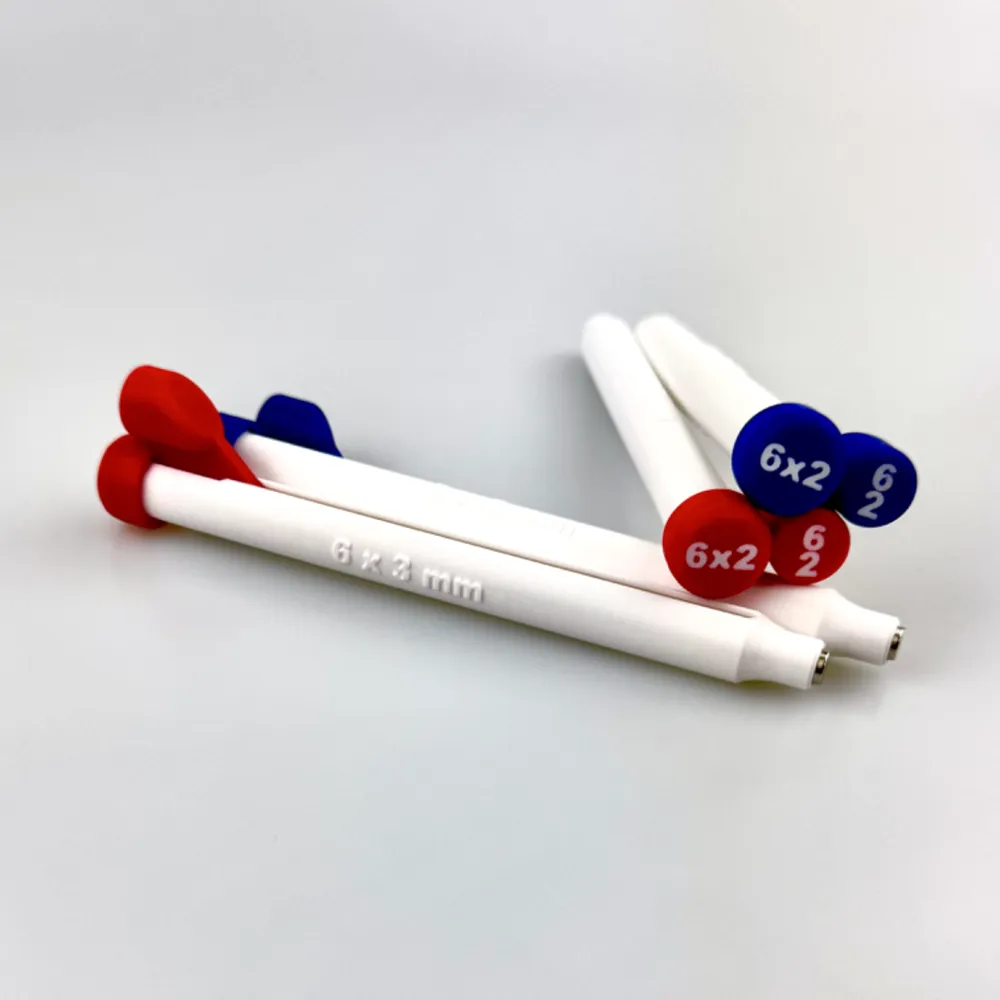
Embedded Magnet Dispenser Tool for 3D Prints
https://makerworld.com/en/models/60890-embedded-magnet-dispenser-tool-for-3d-prints#profileId-63102
Accessories
Gridfinity Holders - Here's a nice set of gridfinity holders that you might like to go with the dispensers. Thanks, @mcclajb! https://makerworld.com/en/models/1366452-gridfinity-holders-for-magnet-dispenser-tool#profileId-1412196 Tip Caps - these are nice caps for the dispensor tip. Not only do they help keep the magnets contained within, but they also protect the tip. Additionally, they are labeled with the magnet size, which is nice. Thank you @onegotowned ! https://makerworld.com/en/models/149038#profileId-162633 Vertical Workbench Stand - This is a nice stand for select diamagers made by @nickramsey57. A number of folks have asked about stands / organizers for the dispensers, so this model will likely be useful to a number of folks. Thank you @nickramsey57 ! https://makerworld.com/en/models/206388#profileId-226561 Vertical Workbench Stand (parametric) - Here is another nice stand made by @RevHazlett. You can specify the dispenser sizes that you want it to hold and then generate, making it customizable to your needs and the common magnet sizes that you use. Thank you @RevHazlett! https://makerworld.com/en/models/435087#profileId-340031
Retort Stand
https://www.youtube.com/watch?v=hEK-369eJbA
One issue I had is with a retort stand bending because of a hair dryer that was putting excess heat into it. I had initially dismissed this problem as I don't use the heating feature of the hair dryer, but I'm afraid that the undergrad students I work with didn't share the same opinion.
I love the idea of jaw extensions to hold larger items like condensors, with the use of dovetails. I also love the use if hex nuts in cylinders
Beaker
Holder for 100mL Beakers for Ultrasonic Baths by Pchem4all
https://www.thingiverse.com/thing:3667067/files
Thermometer Holder on beaker
https://www.thingiverse.com/thing:2290213/files
Gridfinity Pliers Holder by Ryan Meredith
https://makerworld.com/en/models/1432827-gridfinity-pliers-holder#profileId-1490224
Laboratory Equipment
https://makerworld.com/en/contests/95?name=Laboratory%20Equipment#tab-Entries
Small beaker cup
BECHER CUP by cMB-3D Project https://makerworld.com/en/models/1446798-becher-cup#profileId-1506692
Small Beaker labels
Acetone and Isopropanol erase permanent marker, even if I use tape in top. It will eventually erase it
Can't erase a 3D print, fucker. Ha!
Chemistry Lab Solution/Beaker labels Brighton3D
https://makerworld.com/en/models/1470909-chemistry-lab-solution-beaker-labels#profileId-1535175
KILL CANCEL CANCELLED [#B] 3D print
CLOSED: [2023-03-26 Sun 19:34] SCHEDULED: <2022-10-10 Mon>
- State "CANCELLED" from "TODO" [2022-10-20 Thu 16:58]
[2022-10-09 Sun 20:43]
Ender 3 Filament Roller Guide by Holspeed https://www.thingiverse.com/thing:3052488
Fillet Gauge by TnaTmr https://www.thingiverse.com/thing:1184315
Metric screw measuring device - M2/2.5/3/4/5 4-50mm - repost by cmh https://www.thingiverse.com/thing:4635654
Nano Vise (V2) by PRIma https://www.thingiverse.com/thing:5178901
Print in Place Dial-Indicator! - For easy Bed leveling! by Turbo_SunShine https://www.thingiverse.com/thing:4524389
3D-Print-Optimized Geometric Chess Set Pieces by chuckamcknight https://www.thingiverse.com/thing:4168753
Square & Hex ER32 collet set by Schtimpy https://www.thingiverse.com/thing:4242308
TODO Best example of 3D printing in a nice format - chess sets!
https://youtube.com/shorts/bdqeUlaPIKk?feature=share [2022-12-22 Thu 09:19]
Spiral chess sets
Thingiverse 470700 by BigBadBison
Airpod and apple watch charger stand
https://www.thingiverse.com/thing:3329971
Dowel holes
https://forerunner3d.com/design-guide-for-using-dowel-holes-in-3d-printed-parts/
Wear surfaces: Dowel pins provide a hardened steel wear surface for areas of parts that interact with abrasive surfaces. In this example, robotic end effectors grip a threaded pipe coupling. The dowel pins prevent the threads from cutting into the printed plastic, increasing the lifespan of the grippers.
â€Alignment: Use pressed-in dowel pins or shoulder bolts to precisely align multiple components. Press-fit dowel pins are used to line up this fixture with its baseplate, while screws secure it. Use dowel pins for alignment before gluing or bolting the components together to attach multiple printed parts precisely.
Dowel pins
https://www.linkedin.com/pulse/simple-design-guide-alignment-dowels-steven-weinberg https://www.huyett.com/blog/dowel-pin-features
TL;DR Dowel pins are essentially metal pins that are far more accurate than anything I could hope to make, even if i had several lifetimes.
This commenter on Reddit mentioned using filament as dowel pins with 1.75mm holes in their 3D printed parts. While such dowel pins are only useful for locating, they might be a quick and dirty alternative to metal dowel pins that are likely harder to acquire.
Resources
https://medium.com/@wikifactory/ultimate-design-guide-for-3d-printing-2e1ae463a0ff
Klipper and Mainsail
https://all3dp.com/2/mainsailos-simply-explained/
Useful prints
Ender 3 Filament Roller Guide by Holspeed https://www.thingiverse.com/thing:3052488
Fillet Gauge by TnaTmr https://www.thingiverse.com/thing:1184315
Metric screw measuring device - M2/2.5/3/4/5 4-50mm - repost by cmh https://www.thingiverse.com/thing:4635654
Nano Vise (V2) by PRIma https://www.thingiverse.com/thing:5178901
Print in Place Dial-Indicator! - For easy Bed leveling! by Turbo_SunShine https://www.thingiverse.com/thing:4524389
3D-Print-Optimized Geometric Chess Set Pieces by chuckamcknight https://www.thingiverse.com/thing:4168753
Square & Hex ER32 collet set by Schtimpy https://www.thingiverse.com/thing:4242308
TODO Best example of 3D printing in a nice format - chess sets!
https://youtube.com/shorts/bdqeUlaPIKk?feature=share [2022-12-22 Thu 09:19]
Spiral chess sets
Thingiverse 470700 by BigBadBison
Office
â—¤ USB-C DOCK | apple watch magnetic charger https://www.printables.com/model/1070069-usb-c-dock-apple-watch-magnetic-charger/files
Klipper
https://all3dp.com/2/klipper-firmware-3d-printer/
3D Printer ideas
https://all3dp.com/2/3d-printing-ideas-home-decor-models/
https://all3dp.com/2/best-creality-ender-5-pro-upgrades-mods/
Ender-5 Control Panel Back Cover
https://www.thingiverse.com/thing:3353394/files
Summary
This is just a quick back cover that I threw together for my Ender-5. Printed upright with no supports.
edit - I have had a few people that comment that the tolerances are too tight on this. It was designed to the printer that I have and slides on easily with no play to speak of. As close as I could get to a perfect fit. You might want to test a small cross section of the print to check the width on yours. I would suggest scaling up maybe 2% or so if you feel that it is too tight.
Ender 3 Bed Handle
https://www.thingiverse.com/thing:2957507
Ender 3 Cable Chain, no screws, no unplug cable
https://www.thingiverse.com/thing:3769941/files
Thingiverse things to replicate in OpenSCAD
IKEA SKADIS Collection (easy print / tight fit) https://www.thingiverse.com/thing:2853261 https://www.thingiverse.com/thing:2851040 https://www.thingiverse.com/thing:537516
Universal hook for brooms and vacuum cleaners https://www.thingiverse.com/thing:1481777
Raspberry Pi 4 Case for Ender 3 https://www.thingiverse.com/thing:4166751/files
Beer Crate battery holder AA/AAA/9V/18650 Stackable https://www.thingiverse.com/thing:5389119/files
Stackable Box https://www.thingiverse.com/thing:2177645/files
tags: CNC Machines MTM
Resources for Additive Manufacturing
- Common 3D printing troubleshooting
- 3D printing Guide
- Non planar 3D printing
- Paul broke 3D printing from reconstructed surfaces
- E3D open source high performance print heads and tool changers
- Richrap 3D printer blog Good information, detailed. Reprap CoreXY CNC
- Joshua vascus blog CoreXY
- Configuring Marlin Firmaware Marlin
- Dyzedesign Printing at 300mm/s
- Ultimate guide to 3D printer extruder
- Optimal speed for prints
- 3D printed Kinematic designs
- Lazyweb 3D printer resources
- Prusa infill patterns - Wire printing - Wire print
Materials
Printers
- Clean Green printer Paper Colour 3Dprinter
Printer Designs
- Jublie corexy tool changer - D bot alu extruction, corexy, 3d Printed CoreXY - C bot, corexy, printed CoreXY - C bot corexy, printed alu extrusion detailed log - C Bot thingiverse collection - Fork 3D printer - Corexy Fabtotum CoreXY - Sli3Dr 3D printer #Dual wire Gantry CoreXY
- Dyzeddesigns Good resource for optimizing prints.
tags: CNC Machines #3D Printing
- Design for PrototypingFabrication
- Aluminum ExtrusionsMechanical Engineering